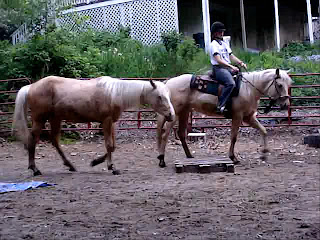
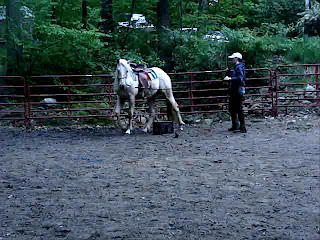
Stevie relaxing on the bridge, with my "assistant", Nick, a three year old colt. I like to have lots of distractions for my colts when I am working, and a loose horse in the ring is certainly one!
I expect at this stage, that the colt can stand still to be saddled, without my having to hold her or tie her up.
I also like for my colt to stay where I put them without wandering off. At this stage, the bridge is really helpful, as it gives them a 'mark', a place to stand that is very clearly defined. Again, my assistant steps in to make sure Stevie stays there!
Swinging up half way and scratching on her.
Off for a ride.
Up on the bridge.
Please use caution and common sense. Horses are large animals, with an exceptional amount of power and strength. They are also concerned above all with their own personal safety, and will do whatever they feel it takes to keep themselves from harm. Being individuals that act and react differently, the only certainty you have when working a horse is uncertainty. I am a professional trainer with twenty plus years experience, yet even with the knowledge I possess, I still get hurt from time to time. This blog and the accompanying media are for entertainment purposes only. No responsibility will be assumed for injuries or damages incurred while trying to use these methods at home. Please ride responsibly; protective gear can save your life!
Tuesday, June 1, 2010
Day fifteen: Riding in the saddle
THEORY AND METHOD
I like to hold of on riding in the saddle, as I mentioned before, until I'm pretty confident that my colt isn't going to overreact to my being up on his back. When I am bareback, I just find that I can get out of the way faster, if need be, and in addition, have a better feel of what the colt is going to do before he does it.
Since the colt has already been introduced to a saddle (as well as been sacked out, worked with a flank rope, surcingle, and been ridden!) this isn't a big deal. Just warm your colt up by reviewing the groundwork basics he's learned so far. I usually just make sure I can send the colt forward, disengage his hips, move his shoulders, and back him up. I might check lateral flexion and vertical flexion, move his head up and down, or flex him by the ears if the mood strikes me. I don't want the colt tired, just in a good state of mind. If the colt is tired, he isn't going to want to move, and forward motion is key to training.
After I saddle up, I will probably spend a few more minutes doing ground work to remind the colt what a saddle feels like when he's moving around with it. Shake the saddle around a bit, slap the fenders, make some noise to see how he will respond. If all goes well, then we'll move on.
As with all horses, be safe when you mount. Tip the colts nose around towards you a bit. Place just your toe in the stirrup, and step up politely. Try not to drag on the saddle; instead, move smoothly and quietly. I step up half way, rest my hip on the saddle and scratch the colt a while before stepping all the way up. Smoothly, without jabbing your colt, put your other foot into the offside stirrup (it's nice, especially in situations like this, to have your stirrups turned on your saddle. You can either do the traditional stirrup twist and hold it steady with a broom stick, or have a saddle shop pre-turn your stirrups for you).
Once I'm up on the colt, I basically just put another first ride on him. Work on getting forward motion, flexing left and right, and making circles. I personally, from this point out, continue to ride the colt bareback for a while longer. I'll work in the saddle now and then to keep him used to it, but prefer to do most of my breaking bareback.
Please use caution and common sense. Horses are large animals, with an exceptional amount of power and strength. They are also concerned above all with their own personal safety, and will do whatever they feel it takes to keep themselves from harm. Being individuals that act and react differently, the only certainty you have when working a horse is uncertainty. I am a professional trainer with twenty plus years experience, yet even with the knowledge I possess, I still get hurt from time to time. This blog and the accompanying media are for entertainment purposes only. No responsibility will be assumed for injuries or damages incurred while trying to use these methods at home. Please ride responsibly; protective gear can save your life!
Saturday, May 29, 2010
Day fourteen: riding the bridge
Stevie caught on really quick with this lesson, far quicker than she did when working on the ground. I find this true of most horses; once they learn to get up on the bridge, they really seem to love it!
Riding up to the bridge:
First time stepping across the bridge
And finally, standing, relaxing on the bridge:
Keep watching... I hope to get the videos of these training sessions online soon; it makes it far easier!
Please use caution and common sense. Horses are large animals, with an exceptional amount of power and strength. They are also concerned above all with their own personal safety, and will do whatever they feel it takes to keep themselves from harm. Being individuals that act and react differently, the only certainty you have when working a horse is uncertainty. I am a professional trainer with twenty plus years experience, yet even with the knowledge I possess, I still get hurt from time to time. This blog and the accompanying media are for entertainment purposes only. No responsibility will be assumed for injuries or damages incurred while trying to use these methods at home. Please ride responsibly; protective gear can save your life!
Day fourteen: riding the bridge
THEORY & METHOD
Once you've mastered the bridge on the ground, riding it shouldn't be too hard. The principles are the same; I just ride at the bridge, keeping the colts nose tipped towards it. If he needs to stop and think or look at the bridge, that's fine. As long as the colt is trying, I'm not going to get after him at all. I want the bridge to be a place he can rest and relax. If I start nagging him to get up on it, it's not going to be as 'safe' a place anymore.
Please use caution and common sense. Horses are large animals, with an exceptional amount of power and strength. They are also concerned above all with their own personal safety, and will do whatever they feel it takes to keep themselves from harm. Being individuals that act and react differently, the only certainty you have when working a horse is uncertainty. I am a professional trainer with twenty plus years experience, yet even with the knowledge I possess, I still get hurt from time to time. This blog and the accompanying media are for entertainment purposes only. No responsibility will be assumed for injuries or damages incurred while trying to use these methods at home. Please ride responsibly; protective gear can save your life!
Monday, May 24, 2010
Day Thirteen: Introducing the Bridge
Stevie did well on this exercise; She has been on trailers before, but only when run through a chute or bribed in with grain. This was the first time I purposely asked her to step up on a bridge. The curiosity she displayed with the tarp (she'd step on it any chance she got!) made me think this wouldn't be too big a deal.
Starting by sending her between myself and the bridge
She's developing some confidence, and stepping a little bit over the corner
Putting one foot on the bridge
Walking across for the first time
Almost had the stop on the bridge, but was a hare late
Stopped on the bridge, and getting loved on!
Please use caution and common sense. Horses are large animals, with an exceptional amount of power and strength. They are also concerned above all with their own personal safety, and will do whatever they feel it takes to keep themselves from harm. Being individuals that act and react differently, the only certainty you have when working a horse is uncertainty. I am a professional trainer with twenty plus years experience, yet even with the knowledge I possess, I still get hurt from time to time. This blog and the accompanying media are for entertainment purposes only. No responsibility will be assumed for injuries or damages incurred while trying to use these methods at home. Please ride responsibly; protective gear can save your life!
Day Thirteen: Introducing the Bridge
THEORY & METHOD
Being able to send my horse over a bridge is much more than just a neat parlor trick for me. For me, a bridge is:
Similar to the exercise where we introduced the saddle, I start off by just sending my horse near the bridge. I'll make circles and gradually cause the horse to be closer and closer. I'll send the horse between myself and the bridge, or in between the fence and the bridge. All I want is for the horse to stop worrying about the bridge, and focus on what I'm asking him to do.
With most horses, I'll give them a chance to go up to the bridge and investigate it. If they aren't interested, that's fine, but I still like to give the option to do so.
When I feel the colt is ready, I'll start sending him over the bridge. Start off by sending him over the narrowest end of the bridge first. Here's where a lot of your ground work comes into play. We want our colt to approach the bridge at a walk. If he trots, he is much more likely to jump the bridge, or to possibly slip and fall if he trots up onto it.
Once your colt can walk across the bridge (and this can take anywhere from a few minutes to a few days. Most horses seem to get it in under fifteen minutes though.), try to encourage him to stop on the bridge. Relax your body, give your cues (I exhale, relax my body, use a voice command, "whoa", then wiggle my lead rope). Again, if you don't get the halt on the bridge, it's fine. Just send him back over and try again. When you even get a hesitation, reward. Pretty soon, you'll be able to let your horse rest on the bridge. For a while, I'll even make it the only resting spot. If I'm asking the colt to trot around in a few circles, I'll ask him to walk near the bridge, then let him step up and take a break. It makes the bridge a safe spot.
Pretty soon, most horses learn to love the bridge. I've got horses that, if you leave the bridge out in their pasture, will step up on their own and just hang out up there. It seems to be comfortable and enjoyable for them!
Please use caution and common sense. Horses are large animals, with an exceptional amount of power and strength. They are also concerned above all with their own personal safety, and will do whatever they feel it takes to keep themselves from harm. Being individuals that act and react differently, the only certainty you have when working a horse is uncertainty. I am a professional trainer with twenty plus years experience, yet even with the knowledge I possess, I still get hurt from time to time. This blog and the accompanying media are for entertainment purposes only. No responsibility will be assumed for injuries or damages incurred while trying to use these methods at home. Please ride responsibly; protective gear can save your life!
Being able to send my horse over a bridge is much more than just a neat parlor trick for me. For me, a bridge is:
- A great preparation for trailer loading
- Prepare for trail riding
- Prepare for putting the horse on a scale (which is a neat thing to do, if there is ever a clinic in your area!)
- As well as testing and developing your relationship with your horse
Similar to the exercise where we introduced the saddle, I start off by just sending my horse near the bridge. I'll make circles and gradually cause the horse to be closer and closer. I'll send the horse between myself and the bridge, or in between the fence and the bridge. All I want is for the horse to stop worrying about the bridge, and focus on what I'm asking him to do.
With most horses, I'll give them a chance to go up to the bridge and investigate it. If they aren't interested, that's fine, but I still like to give the option to do so.
When I feel the colt is ready, I'll start sending him over the bridge. Start off by sending him over the narrowest end of the bridge first. Here's where a lot of your ground work comes into play. We want our colt to approach the bridge at a walk. If he trots, he is much more likely to jump the bridge, or to possibly slip and fall if he trots up onto it.
- If he tries to escape out one side, it's okay. Just disengage his hips, keep his nose towards the bridge and try again. I'll keep moving those hips out of the way and bringing the colt back to the bridge for as long as it takes.
- If he tries to jump over the bridge, that's okay too. Jumping over the bridge is a try. That colt is trying to do what you want, but just doesn't have the confidence to put his foot on the bridge yet. It's fine. Let him hop over, then disengage his hips and stand there for a few moments. Send him back across, repeating the steps if he jumps. Decrease the amount of time you let the colt rest; remember, each time you ask, you are looking for a bigger try. The first time your colt so much as places a single hoof on the bridge, give him a long rest, a big pat, and I would probably even move onto another exercise for a while. Let him know that he did the right thing.
Once your colt can walk across the bridge (and this can take anywhere from a few minutes to a few days. Most horses seem to get it in under fifteen minutes though.), try to encourage him to stop on the bridge. Relax your body, give your cues (I exhale, relax my body, use a voice command, "whoa", then wiggle my lead rope). Again, if you don't get the halt on the bridge, it's fine. Just send him back over and try again. When you even get a hesitation, reward. Pretty soon, you'll be able to let your horse rest on the bridge. For a while, I'll even make it the only resting spot. If I'm asking the colt to trot around in a few circles, I'll ask him to walk near the bridge, then let him step up and take a break. It makes the bridge a safe spot.
Pretty soon, most horses learn to love the bridge. I've got horses that, if you leave the bridge out in their pasture, will step up on their own and just hang out up there. It seems to be comfortable and enjoyable for them!
Please use caution and common sense. Horses are large animals, with an exceptional amount of power and strength. They are also concerned above all with their own personal safety, and will do whatever they feel it takes to keep themselves from harm. Being individuals that act and react differently, the only certainty you have when working a horse is uncertainty. I am a professional trainer with twenty plus years experience, yet even with the knowledge I possess, I still get hurt from time to time. This blog and the accompanying media are for entertainment purposes only. No responsibility will be assumed for injuries or damages incurred while trying to use these methods at home. Please ride responsibly; protective gear can save your life!
Saturday, May 22, 2010
Day Twelve: First Saddle
Today, after doing all our groundwork, I introduced Stevie to her first saddle ever. She did excellent!
All tacked up and off for a walk!Please use caution and common sense. Horses are large animals, with an exceptional amount of power and strength. They are also concerned above all with their own personal safety, and will do whatever they feel it takes to keep themselves from harm. Being individuals that act and react differently, the only certainty you have when working a horse is uncertainty. I am a professional trainer with twenty plus years experience, yet even with the knowledge I possess, I still get hurt from time to time. This blog and the accompanying media are for entertainment purposes only. No responsibility will be assumed for injuries or damages incurred while trying to use these methods at home. Please ride responsibly; protective gear can save your life!
Thursday, May 20, 2010
Day twelve: first saddle
THEORY AND METHOD
I introduce the saddle after I have made the first ride. As I said in earlier posts, I feel that riding bareback keeps me honest in my ground training, and reduces the risk of injury once I'm up on the horse. So, for my purposes, putting a saddle on doesn't need to be done very early in the training (of course, it can be... the more your colt is exposed to, the better!).
If you've gone through all the steps we've talked about earlier, this should be a non-event. You colt should already be used to you sacking him out with novel objects, so a saddle and pad is nothing! He is already used to the cinch because you've done your work with the flank cinch. I feel this is very important. Many people (myself included for a number of years) will throw a saddle on the horse, and then turn them loose to just buck and run and carry on until they settle and accept the saddle. I never want my horses to buck with a saddle on. Ever. Getting them used to the saddle in this way sets that precedence.
So, to begin, I place all my tack (my saddle, blanket, cinch, and breast collar if one is being used) in my arena. I'll do my ground work around the tack, completely ignoring it, but letting my colt get closer and closer. I'll then send the horse up to the tack and allow him to investigate it. If he feels like he needs to touch, lick, even chew the saddle, I'll let him (I designate a special saddle just for colts for this reason!).
Once the colt has explored a bit, I'll go ahead and tack him up. I try not to 'tip-toe' around him as that just tends to make the colt think there is a reason to be nervous. Just like when I'm sacking the colt out, I'll toss the saddle blanket on and off over the back a few times before settling it in place. Then I'll put the saddle on. Swing it up politely and gently, but again, don't tiptoe around. Put your stirrups and cinch up over the seat so they don't bang on the off side. Rock the saddle around a little so the horse can get a feel for it moving.
If your colt is really nervous with all this, don't cinch up yet. Rock the saddle gently until he either relaxes or stands still for ten seconds. Pull the saddle and blanket off. Repeat the whole procedure, starting with the blanket all over again. Keep taking the tack on and off until you notice a change in behavior; a relaxed, quiet appearance.
As long as everything is going well, you can cinch up. Use caution crossing in front of the colt, in case, in spite of all your preparation, he jumps or spooks. Cinch up tight enough that it will not slide, but not overly tight. Again, assess your horse. If he looks like is is ready to blow, very nervous, or maybe he freezes up, then you aren't ready for the next step. You should at this point put the cinch on and off, multiple times, gradually getting tighter each time.
When you colt can tolerate you saddling and cinching him up, start your basic ground work. Remember, sometimes even with all your prep work, the colt will still buck and carry on. Hopefully, you can influence his feet enough to keep him under control. Keep your colt moving in a circle, yield his hips, change directions and speed frequently. The more he has to pay attention to what you want, the less time he has to pay attention to the 'horse eating monster' up on his back. Work your colt until he seems comfortable with the saddle, then end your session on a good note.
Please use caution and common sense. Horses are large animals, with an exceptional amount of power and strength. They are also concerned above all with their own personal safety, and will do whatever they feel it takes to keep themselves from harm. Being individuals that act and react differently, the only certainty you have when working a horse is uncertainty. I am a professional trainer with twenty plus years experience, yet even with the knowledge I possess, I still get hurt from time to time. This blog and the accompanying media are for entertainment purposes only. No responsibility will be assumed for injuries or damages incurred while trying to use these methods at home. Please ride responsibly; protective gear can save your life!
Day eleven: First ride
After reviewing some basic ground work, I made the decision that Stevie was ready for her first ride. The weather was far less than ideal; it was an unusually chilly day with very high winds. But, as she has been doing really well up to this point; she has handled everything I've thrown at her. The biggest issue we had came with the flank cinch; it caused a big bucking response. However, even though I intentionally caused a bucking response, by waiting until Stevie gave me a positive response to the flank rope to release it, she learned that bucking doesn't get her anything.
So, because I have excellent control of Stevie's feet, she is tolerant of being sacked out, having someone above her, of being restrained, and has some exposure to carrying my weight, I felt she was ready to ride. Check out the previous post for more a complete description of the steps I'm taking in the following pictures. Stevie did very well. She remained relaxed and soft throughout the entire ride. The only problem we encountered was the fact that she didn't really want to move much; she'd flex her neck around, and would disengage her hips, but forward motion was fleeting... all in all, it's not a problem I mind having on the first ride! We more than accomplished our goal on this first ride today.
Step one: hanging over the colt's back
Step two: swinging the legs up
Step three: sliding the left leg into place (note: I've made a calculated error here in letting Stevie turn her head to the left. I usually try to keep the head bent around to the side I'm getting on from, in case I need to get off in a hurry). Before I move on, however, I will correct this.
Step four: Both legs in position (between the last frame and this, I've actually stepped off for a moment. In the following images, I'm getting on from the left rather than the right. So here, Stevie is flexed in the correct direction. You can see I am in the process of straightening my upper body.
Step five: Finally on!
Step six: practicing flexing
Step seven: encouraging forward motion (you can see just how much the wind was blowing in these frames!)
Step eight: get some forward motion (it wasn't much, but she did move forward some... that's close enough for government work!)
Please, again I urge you to seriously evaluate your own abilities before getting on a colt for the first time. If you aren't confident in your riding abilities, or have never put the first ride on a horse before, you may want to seek the advise of a professional trainer, if for nothing else but to have a body on the ground to help you if you should need it. Remember, it doesn't matter what day of training you are in before you make that first ride; what is important is that your colt has a solid enough foundation that you aren't going to get hurt, and your horse isn't going to become overly confused or upset.
Please use caution and common sense. Horses are large animals, with an exceptional amount of power and strength. They are also concerned above all with their own personal safety, and will do whatever they feel it takes to keep themselves from harm. Being individuals that act and react differently, the only certainty you have when working a horse is uncertainty. I am a professional trainer with twenty plus years experience, yet even with the knowledge I possess, I still get hurt from time to time. This blog and the accompanying media are for entertainment purposes only. No responsibility will be assumed for injuries or damages incurred while trying to use these methods at home. Please ride responsibly; protective gear can save your life!
Wednesday, May 19, 2010
Day Eleven: First Ride
THEORY AND METHOD
Very often, I choose to ground drive a colt before I put the first ride on them. However, if I feel that they have progressed sufficiently through their ground work, I have an exceptional deal of control over their feet, good lateral flexion, and can sack them out, I may just hop on.
Basically, if you have a good foundation on your horse, getting on for the first time should be a non-event. Now, as we all know, horses are predictably unpredictable. Some horses, no matter how much you prepare them, will react when you get on for the first time. It's a new feeling for them, and they can get claustrophobic when they feel your legs on either side of their body. What your ground work does, however, is give you a good idea of how your horse will react when you do step on the first time.
By this point in your training, your colt should be used to you being up above him. He should stand quietly while being sacked out. He should know how you yield every part of his body softly with little to no resistance. He should have learned that bucking is not an appropriate response, and the only way to get rid of pressure is to stop bucking. If your colt knows these things, there is a better chance of the first ride going well.
I choose to start off bareback. I've ridden far to many colts that have been ill-prepared for riding. As a result, they've done some acrobatics to try and get rid of me! A good number of them have opted to go up and over. With a western saddle on, I've been lucky to get away with just minimal injury... a hairline fracture to my hip. When you are riding bareback, it is far easier to bail out if something goes wrong. It also tends to keep me more honest. If I know I am getting on a colt bareback, you can bet I'm more apt to put in the time it takes on the ground first!
How much we do on the first ride depends a lot on the colt. I prepare by going through the exercises he has already learned. When he is in a good frame of mind, is nice and relaxed, then I'll start.
First mounting
Because my colts are all used to my hanging over their backs, that's where I'll start. From my block (because, again, I'm not such a good jumper!), I'll hop up and drape my belly over the colt's back. With my left hand, I'll flex his head slightly towards the left. This way, if he acts up, I can step down and get his hips moving away from me.
So long as he remains relaxed, I'll move on. I swing both my feet up on top of the colts rump. Moving my boots around gives me an idea of how my colt will react. Again, so long as everything feels quiet underneath me, I'll keep going. I try to move slowly, but deliberately; don't tiptoe around your colt, or move so slowly that you just annoy or 'tickle' the horse. Slide your left leg into position, keeping your upper body down against the neck. Slide your right leg into position. Gradually straighten up. Congratulations! You are on your colt!
Checking in
Now that you are up there, you need to check in with your colt. Keep your body relaxed, don't grip tightly with your legs as it may scare him. Just like you did from the ground, flex your horse's head from side to side. Start slowly; expect a lot, but accept a little. The first inch of flexion is always the hardest to get. Take your time to get this as good as you can, it's your safety net if you need to stop your colt.
The ride
Some horses won't stand still for flexing when you first get on, and that's fine. If he feels he needs to move his feet, I'll let him. While he is moving, however, I will keep him flexed. In the beginning, I will flex more, but as he gets comfortable, I'll start to let him straighten up.
Many colts, however, are unbalanced and nervous their first few rides. They are not confident enough to step out without encouragement. For these colts, I sit up nice and straight (without being tense). I use a voice command that they should already know from ground work. Keeping the neck flexed slightly, I'll start tapping my hand on my chaps to make some noise. This is often enough to get their feet going a bit. If not, then I'll start to use gentle leg pressure, remembering that legs are totally foreign still. What is important is that the INSTANT the colt steps forward, to release the pressure. If all I get on the first ride is a step or two, I'm happy!
Dismount
Some colts are more bothered by the dismount than by the first mounting! I tend to think it's because they become startled when you go to step down, as you've probably been sitting relatively still for a while. So, to counter this, I start by flexing the neck, so I have some control. I then start moving my legs around, first on one side, then on the other. Basically, I'll just reverse the mounting procedure. Lowering my upper body, I'll bring my right leg up and rest it on top of the horse's back. I can then slide my self off safely.
At this point, I will usually get on the colt from the other side and repeat the whole procedure. When I get on from the right, I tend to flex the colt to the right for the whole ride. When I get on from the left, I flex to the left.
Before you make the first ride, you really need to take a good look at your riding ability. If you aren't comfortable or confident enough to ride your colt, no matter what happens, you may want to reconsider putting the first ride on him. Use common sense and keep your safety in mind!
Please use caution and common sense. Horses are large animals, with an exceptional amount of power and strength. They are also concerned above all with their own personal safety, and will do whatever they feel it takes to keep themselves from harm. Being individuals that act and react differently, the only certainty you have when working a horse is uncertainty. I am a professional trainer with twenty plus years experience, yet even with the knowledge I possess, I still get hurt from time to time. This blog and the accompanying media are for entertainment purposes only. No responsibility will be assumed for injuries or damages incurred while trying to use these methods at home. Please ride responsibly; protective gear can save your life!
Tuesday, May 18, 2010
Day Ten: flexion
Still progressing nicely. We had much better luck when flexing the head and neck towards me, but after a few repetitions, Stevie was flexing away from me just as nicely! The winding up exercise is one this filly was already familiar with; it's one of the first things I teach my young horses, especially during halter breaking because it tends to get them lighter off the lead rope.
Winding up: I start by draping the lead rope above the hocks, and backing away from Stevie.
As I back away, Stevie bends her head and neck around and disengages her hindquarters.
A few more steps backwards starts to bring her shoulders around.
Lateral flexions:
This exercise basically simulates what happens when I ride. It's important that each time you flex your colt, you hold it until they soften; it's not a true flexion until that happens. As a side note, each time I flex her neck towards me, I'll end by stepping her hips away. This reinforces the connection between the rein and her feet. So, basically, the sequence goes something like this: flex the neck to me, wait for her to soften, then turn and drive the hips away to release the pressure.
Here, she has softened, and I've turned to drive her hips.
Initially, when we started flexing away from me, Stevie showed a great deal of resistance due to confusion. She's comfortable to flexing towards me, and knows that it's the quickest way to get relief from pressure. Because she is confused, it manifests as resistance.
It didn't take too long before Stevie discovered that she could flex away from me too. Notice the difference in expression from the above picture. The confusion is gone, and she is nice and soft. She's getting there!
Please use caution and common sense. Horses are large animals, with an exceptional amount of power and strength. They are also concerned above all with their own personal safety, and will do whatever they feel it takes to keep themselves from harm. Being individuals that act and react differently, the only certainty you have when working a horse is uncertainty. I am a professional trainer with twenty plus years experience, yet even with the knowledge I possess, I still get hurt from time to time. This blog and the accompanying media are for entertainment purposes only. No responsibility will be assumed for injuries or damages incurred while trying to use these methods at home. Please ride responsibly; protective gear can save your life!
Day Ten: Flexion
THEORY AND METHOD
Being able to flex the neck is an absolute prerequisite to the first ride. A horse that braces against pressure on the face is not only difficult to ride, but leaves you with no control if something goes wrong. Before I think about stepping on a horse, I need to know that I have the ability to turn them.
Winding up
This is an exercise that is very easy to teach. Most horses respond very well to this, learn it quickly, and seem to enjoy it. When winding a horse up, we are asking the horse to tolerate a rope behind the hind legs, to flex his neck in response to pressure, and to move his feet accordingly.
Start by running the your lead rope from the halter, behind the horse (above the hocks), and back to you on the other side. Putting pressure on the lead rope should cause your colt to flex his neck. Walking backwards, you'll continue to put pressure on the rope, resulting in your colt yielding his hips. If you continue walking, the front end should start to pivot around the hips, and the horse will finally walk forward towards you.
Start slow, working step by step. Pretty soon, you'll find your colt will soften up and figure out this 'game'!
Lateral flexions
You can practice basic flexions you'll need when riding while you are still safely on the ground. Stand back by the withers, you can put your hands in a position close to where they will be when you are mounted. Practice flexing your horse's neck towards you from either side. To increase the challenge, toss the rope over the horse's neck and flex the neck away from you. Challenge yourself to see how soft and light you can get your colt.
Please use caution and common sense. Horses are large animals, with an exceptional amount of power and strength. They are also concerned above all with their own personal safety, and will do whatever they feel it takes to keep themselves from harm. Being individuals that act and react differently, the only certainty you have when working a horse is uncertainty. I am a professional trainer with twenty plus years experience, yet even with the knowledge I possess, I still get hurt from time to time. This blog and the accompanying media are for entertainment purposes only. No responsibility will be assumed for injuries or damages incurred while trying to use these methods at home. Please ride responsibly; protective gear can save your life!
Monday, May 17, 2010
Day nine: Hobbling
Stevie's first experience with hobbles was pretty uneventful (as I want every experience to be!). There was a little bit of fighting the hobbles as she figured out how to balance herself, but all in all, it was a good session.
First off, do your homework. Practice your leg tugs and review your ground work. You need to know how to use your hobbles. Get really good at taking them on and off quickly and smoothly. Just in case, carry a knife with you (a good all-around horsemanship tip, by the way).
The hobbles I'm using are pretty standard. Start off by looping the hobble around the off-side pastern, and running it through the first ring.
Next, run the strap of the hobble through the second ring. The only parts of the hobble that should your horse should be felt lined.
Finally, buckle the hobble, snugly, around the near side pastern.
Stevie did fairly well. First she wanted to investigate what was holding her legs together.
Then, tried to test how far she could move her legs.
She only went too far once. Took a little stumble to her knees, but popped right back up no worse for the ware.
By the end of the session, she was standing quietly (albeit playing with her lead rope!).
Please use caution and common sense. Horses are large animals, with an exceptional amount of power and strength. They are also concerned above all with their own personal safety, and will do whatever they feel it takes to keep themselves from harm. Being individuals that act and react differently, the only certainty you have when working a horse is uncertainty. I am a professional trainer with twenty plus years experience, yet even with the knowledge I possess, I still get hurt from time to time. This blog and the accompanying media are for entertainment purposes only. No responsibility will be assumed for injuries or damages incurred while trying to use these methods at home. Please ride responsibly; protective gear can save your life!
Day nine: Hobbling
THEORY & METHOD
Hobbles are a great tool for teaching your horse patience, restraint, and can be a lifesaver. A properly hobble trained horse is far less likely to panic if he ever gets a leg hung up in a fence, over a lead rope, or in his hay net.
Before you just put a pair of hobbles on, it is good practice to prepare your horse. This goes for just about anything you can think of to teach your horse; if you are able to break each lesson down into more fundamental pieces, then there will be less resistance and confusion from your horse.
Leg tugs
The preparatory work is easy enough; simple leg tugs. Loop a soft cotton rope around your horse's pastern, move his leg in all different directions. Lead him forward with the leg rope. Move his leg inwards and outwards. Lift the leg and hold it up. See if you can bring the leg backwards. Work with both front legs until the horse readily lifts and moves his foot. Once you've accomplished this, it's pretty safe to move on.
Hobbles
The first time you hobble a horse, make sure you do it in a soft, sandy area. Odds are your horse is going to trip a time or two while figuring out the hobbles. We don't want this to turn into a bad experience by having him whack his knee on hard packed dry lot! Depending on your horse, you may wish to put on some form of leg protection as well.
For hobbles, I use a simple leather hobble lined with felt. With my horse haltered, and a long lead rope attached, I put the hobbles on. Make sure you know how to put them on and are smooth, comfortable, and quick at it. If need be, practice on an older, more experience horse before hand. You want to get the hobbles on, stand up, and get yourself out of harms way. Some horses will try just about anything to be able to move around with their hobbles on. My older gelding developed a unique gait while wearing hobbles, and could cover a lot of ground very quickly. He'd rock back on his haunches, lift both front legs off the ground and bunny hop forward. Getting clipped by one of those hooves would certainly have ruined my day!
Let your horse wear the hobbles for a while; I don't like to encourage the horse to move around, as I feel it defeats the purpose of the hobbles. Keep a hold of the lead rope in case you need to get your horse out of a jam. I keep the hobbles on until the horse stops trying to move around. Once my horse relaxes and stands for a few minutes, I'll take off the hobbles, and call it a day.
Please use caution and common sense. Horses are large animals, with an exceptional amount of power and strength. They are also concerned above all with their own personal safety, and will do whatever they feel it takes to keep themselves from harm. Being individuals that act and react differently, the only certainty you have when working a horse is uncertainty. I am a professional trainer with twenty plus years experience, yet even with the knowledge I possess, I still get hurt from time to time. This blog and the accompanying media are for entertainment purposes only. No responsibility will be assumed for injuries or damages incurred while trying to use these methods at home. Please ride responsibly; protective gear can save your life!
Day Eight: Advancing Groundwork with drills
Stevie has advanced to a point where she needs more of a challenge. Circling and yielding her hips is easy; she can do it very lightly with very little effort on my part. Adding new steps will improve her handle and keep her tuned in.
Working on squeezing Stevie between myself and the fence.
Putting her nose on the fence.
Encouraging Stevie to back up.
By the time we were done, Stevie was stepping sideways two to three steps each way. The drills help lighten her up and tend to keep her thinking. This makes them a great way to prepare for riding!
Please use caution and common sense. Horses are large animals, with an exceptional amount of power and strength. They are also concerned above all with their own personal safety, and will do whatever they feel it takes to keep themselves from harm. Being individuals that act and react differently, the only certainty you have when working a horse is uncertainty. I am a professional trainer with twenty plus years experience, yet even with the knowledge I possess, I still get hurt from time to time. This blog and the accompanying media are for entertainment purposes only. No responsibility will be assumed for injuries or damages incurred while trying to use these methods at home. Please ride responsibly; protective gear can save your life!
Subscribe to:
Posts (Atom)